diy clay teardrop necklace
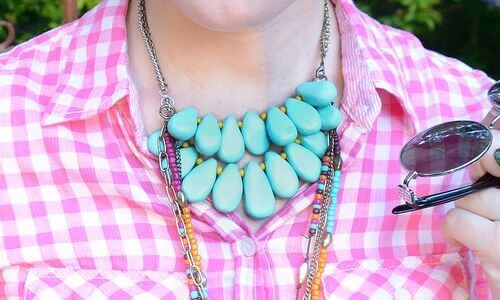
Hello craftsland! Here at the Craftcorners blog we’re excited to share another jewelry inspired craft with you all. Many of us got to experiment with clay as kids. Whether it came in the form of shaping little animals and objects or more serious clay pursuits like pottery, we all remember how much fun playing with clay used to be. That sense of fun and wonder is exactly what we’re aiming to capture with today’s clay teardrop necklace craft. This type of necklace is a fun and artistic way to make a fashion statement, and goes well with more eclectic outfits. Let’s see what we need to get started!
What You’ll Need
- Bake-able clay or silicone mold rubber.
- Oven
- Paint
- Needle and jewelry string
- Beads of your choice
- Necklace
- Hairspray
What You’ll Need
The first thing you’ll need to do is to simply shape your beads. Don’t worry about trying to make the beads exactly identical – chances are it’s just not going to happen. Just get them to be the same general shape and size – beyond that, the little differences between the beads will lead to a fun eccentricity. Be sure to poke a hole at the top of your beads before sticking them in the oven for about 15 minutes at 375 degrees.
Once your beads have hardened and cooled, paint them in your chosen color and seal them with a few coats of hairspray. At this point all that’s left to do is simply to string along the beads on your necklace in any order you like! A consideration to make here is that you’re certainly not limited to making just one specific type of bead. In fact you can make a number of different beads of varying sizes and colors and use them to mix up the composition of your necklace for a truly one of a kind item to go along with your light saber party favors.