How to make wire name card holders
Please follow and like us:
Name card holders create an extra personal touch to your well thought out tablescape. If you love having your friends over for potlucks and pride yourself in paying attention to the detail when decorating, crafting these simple name card holders can make your gatherings more special and intimate!
Supplies needed
- 18 gauge wire in a color of your choice
- Cardstock in a color of your choice
- Scissors
- Pliers
- Clear ID badges
(optional)
Directions
-
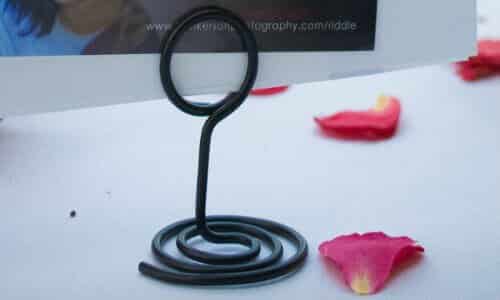
- Take the wire and create a base shape. In the picture above, it is a swirl, but you can make other shapes like a heart, four leaf clover, etc.
- Bring the wire up to make about 2 inches, or longer depending on your preference.
- For the top, you can create a circle like above that wraps around twice like a key chain ring so you can slip a name card in between.
- To finish the name card holder, use your pliers to snip the wire at the end.
- For name cards, use your scissors to cut the cardstock in any shape you desire.
- You can print names onto the cardstock in advance and cut them out after, or you can use decorative pens like turquoise pens
or gel pens to make unique handwritten cards.
- If you have ornately decorated your name card holders to give away to your guests at the end of your gathering, you can place the cards in clear id badges before fastening them in to the name card holder to protect them from getting ruined by the wire.
There you have it! This is a very basic tutorial for making a name card holder, but you can get more creative in choosing different materials to use for its construction and decorating. Share ideas and techniques you used below in the comments section!